Showing posts with label lace. Show all posts

Wednesday, December 29, 2021

Double - Layered Lace Flower Granny Square

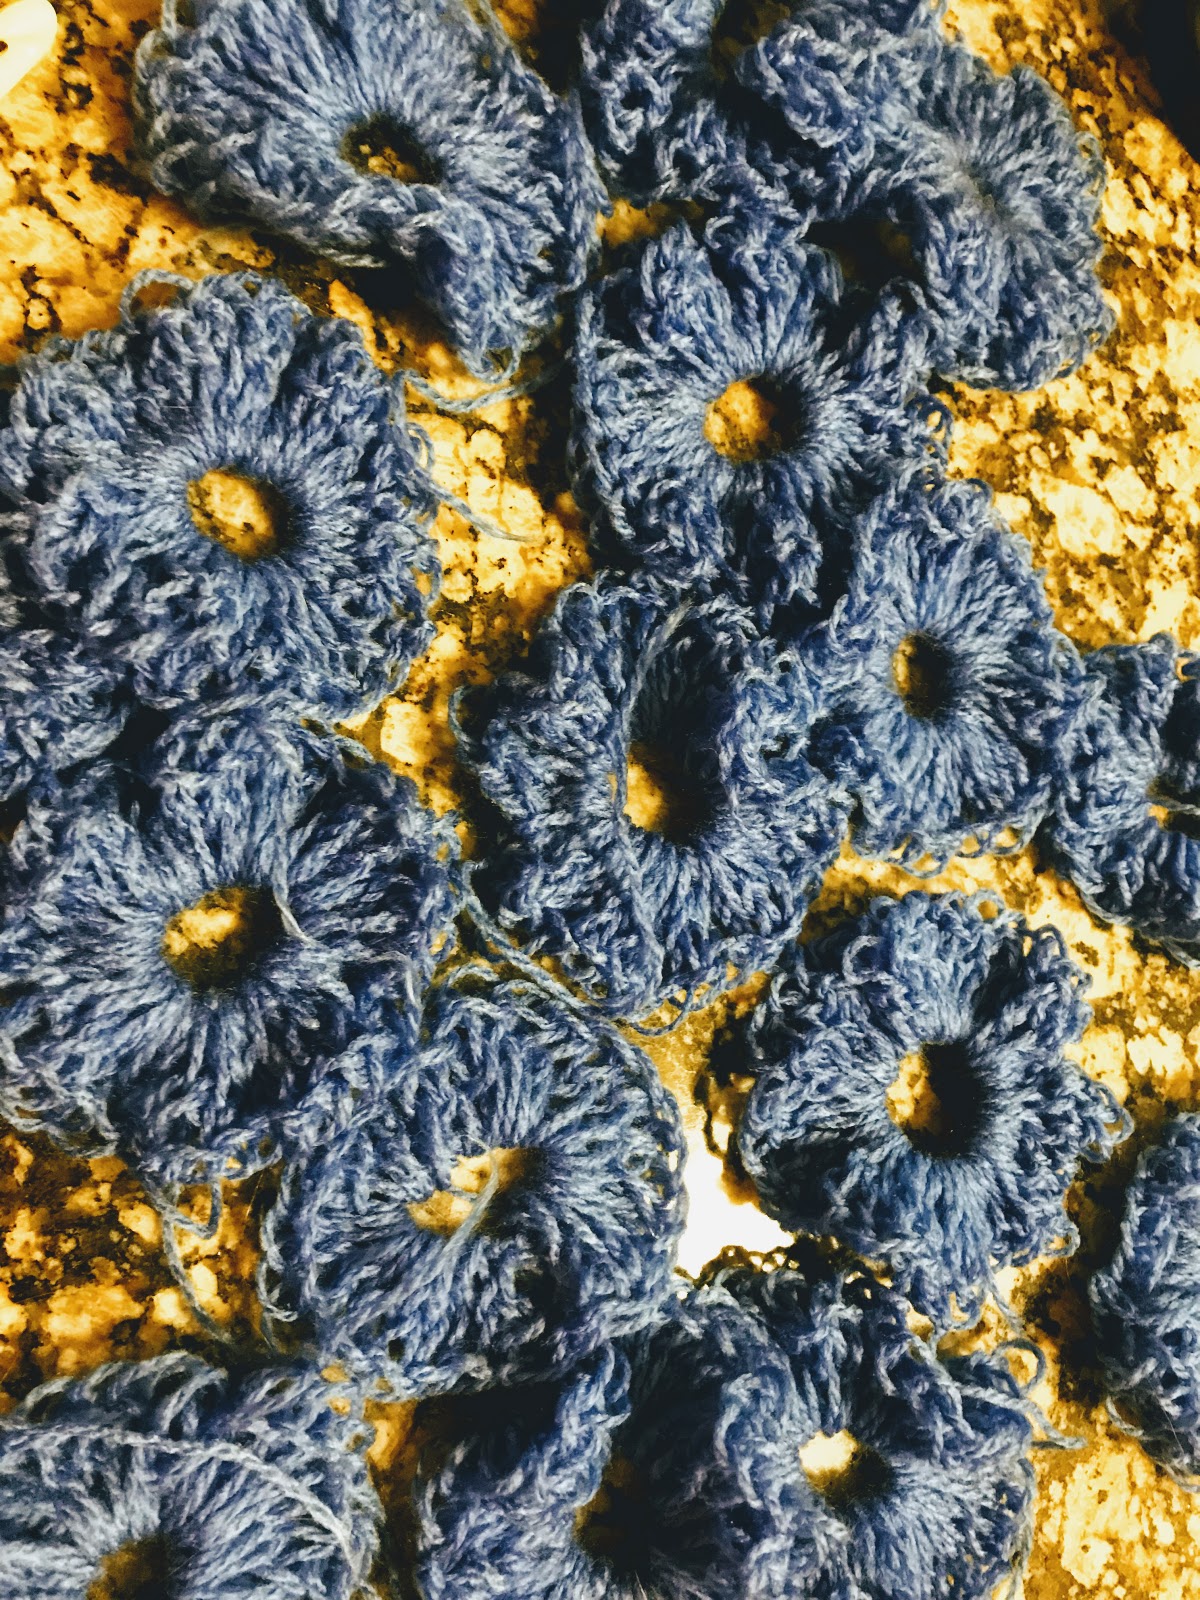
Double-Layered Lace Flower Granny Square 

Double-Layered Granny Square.  This is just putting two regular 
granny squares together then adding an additional row 
to sew them together. 
The granny squares have 5 rows then 1 more additional row to put them together.
Then sew on the Lacey Flower with 
a yarn needle and matching yarn.  Sew a bead or button onto the center.
Make 16 double-layered squares.  Each square will have a bead.


Project Supplies
N Crochet Hook
Yarn Needle
Matching Thread
16 Beads or Buttons
Small Crochet Hook 
(To Hide Short Threads) 
Double Crochet - Single Crochet
Easy
 I used # 4 weight yarn.
32 Squares
I used 24 

for Smaller One
18 Squares

Yarn Supplies
Red Heart Stripes - 6 skeins
Solid Turquoise Yarn

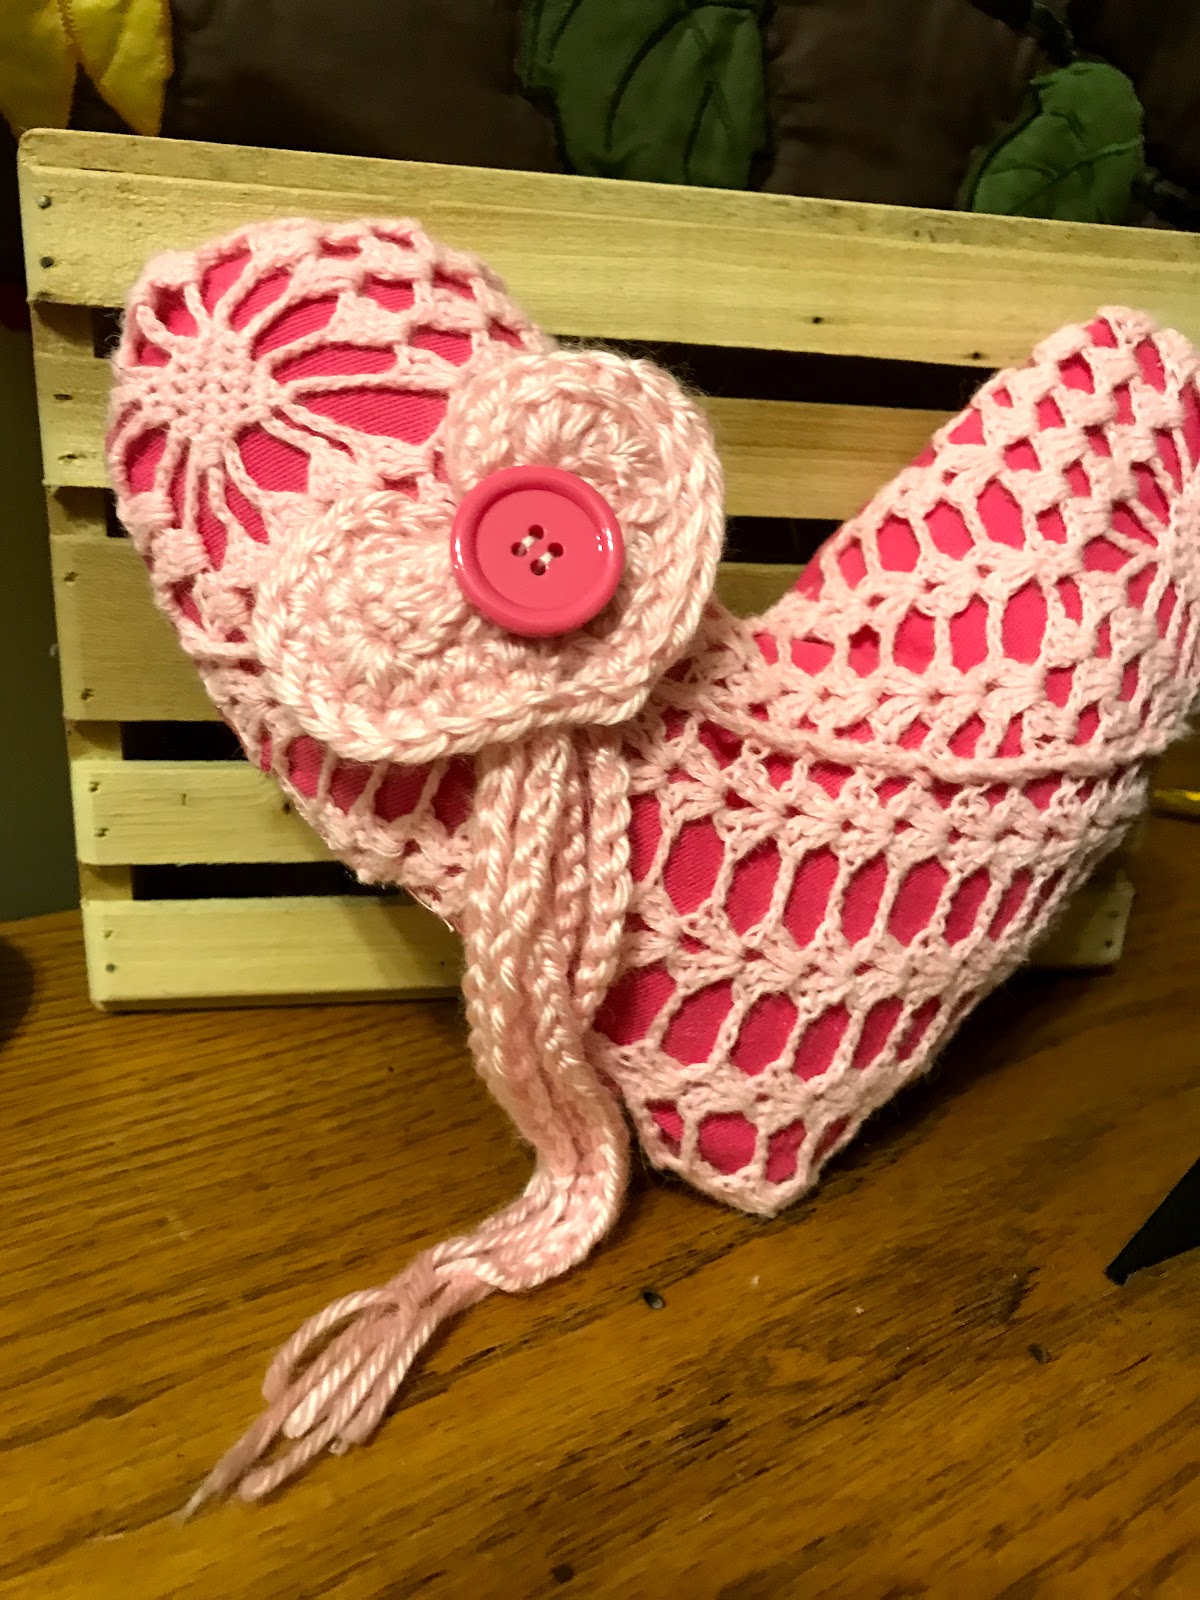
Lacey Flower Applique
Make a Magic Ring = MR  - Follow Here To See MR
Double Crochet = DC 12 times in the MR
The first DC is a Ch = Chain 3
Slip Stich = SS closed at the top of the beginning chain 3
Pull the center yarn thread to tighten the center closed.

Now Ch 4 in the same space the SS into the same space making a loop.  
*Single Crochet = SC into the next space Ch 3. SS into the same space making a loop. 
Continue at * until you put a loop into each space.  SS close at the bottom of the first chain 4.
Tighten the center yarn thread again.  Cut the thread from the yarn supply then weave the yarn thread to the center with your yarn needle.  Tie the two center threads together 3x. Tie
the Lacey Flower onto the center of your Granny Square.  Use a yarn needle and the matching yarn sew just around the top of the spaces but below the loops.  Go in then out then go back through the out but slightly over and back through where you went in.  Go back where you came in but slightly over then back out. Then go forward to another section and do the same all the way around.  Cut the yarn then hide the end by weaving it into your work.  Smooth out the applique.


 16 Of the smaller glass beads - One On Each Flower.
I purchased these beads at Michaels Craft Store.
Buy 5 strands.
You will have beads leftover --
all the larger ones.


To sew on these beads use matching thread 
and a regular needle. I do not tie a knot yet, leave around 1 and 1half  to 2 inches of thread out rather than tieing a knot.  Keep the thread doubled.
Sew from right to left of the bead.  
*With your needle grab yarn one-fourth inch from the entrance. Then go through the bead going out
the exit and grab one-fourth of yarn then pull upwards on the needle and thread.  Work the thread under the bead.  Then bring the needle back to the entrance and repeat *   2X.
Now wrap the thread around the bead edges pull securely 2X.  Then make a small stitch just under the entrance 3X layer. Take your needle through the last loop to knot it.  This is to secure it.  You should see no threads.  Now use the jewel glue under the bead.  Use the back of your yarn needle to apply the glue then clean your needle. Put pressure onto the bead for a few seconds.  Move onto the next bead.

Sew all the squares together with matching yarn.
Each row consists of four squares.  So make four rows of four squares - then sew
all the rows together.  
or
three rows of three or four - for a smaller size.


Susan Nikitenko © 2021


Wednesday, March 24, 2021

Almost Done With My Granddaughters Dress

  My Granddaughters Dress


I still have two butterflies to sew on.
and a Hook and eye. 

When It is completely finished I will post
it in this post.

Size 8/10


Below are the other two dresses 
I'm working on.


Susan's Phone Pics


Friday, March 19, 2021

I've Been Sewing -

I've Been Sewing

I have been working on three dresses.  

This is the one I'm closest to finishing. 

I've kept these butterflies for a long time and

 I'm considering using these butterflies to embellish

this dress.   I'm thinking about attaching them to the wrist or onto the belt. 

Maybe both, I'll let you know what I choose to do.


I did one sleeve and I'm getting ready to sew on the other one.

I have the skirt part completed now I have to sew the skirt onto the bodice.

I have lined both the skirt and the bodice.  

When I finish that it will be time for me to finish the back of the bodice

and sew the butterfly buttons onto it also.

I can not post to Facebook because Facebook has 

kept me from posting or it's just broken.

I'm not sure yet what's going on.


I finished both arms now. I'm going to quit for today and 
hopefully, I'll finish this dress tomorrow.
If not maybe Monday.


Susan's Phone Photos


Thursday, February 1, 2018

Crochet Heart Pillow Embellishment


I used already crocheted pieces ...
I used three different crochet heart patterns to embellish my pillows.
I added beads, buttons and crochet chains. 
I used a needle and thread.

I used these three videos to make my hearts.
The bigger heart is the middle video.
I made all three different hearts.


 Romans 10:10 For with the heart man believeth unto righteousness; and with the mouth confession is made unto salvation.

Wednesday, December 27, 2017

Heart And Lace Crochet Block


Heart And Lace Crochet Block

I used the daisy stitch, double crochet and single crochet stitches
in this crochet block.
I will post the pattern as soon as I can.


Blue Lace Pineapple Ring


for the blue lacey ring I used 2 ply Herrschners Afghan yarn (cobalt blue)
Crochet Hook US - N - 

Crochet 4 Attach in first loop making a ring.
Crochet 3 -  Double Crochet 50 double crochet then attach ring with a slst.


4 vrs 5


Peach Heart 

size G/6 needle 4.25mm
for the heart I used 4ply Caron Simply Soft  (strawberry fraise fresa) peachy pink

start with loose slip knot then crochet one- go into beginning loop - single crochet chain 1 then half double crochet (hdc) 4 times ( I used 4)- 5 if you want a larger heart.
slip stitch into first chain closing the circle.

 slip stitch in next loop then:  in the same loop
1 hdc - 3dc - 1 hdc.   hdc in next 3 stitches chain 1
then dc in the bottom stitch,
 which is even with the v at the top.
hdc into the next two upward stitches.
then in the next stitch - 1 hdc -three dc- 1 hdc.

End with going into the center of the heart 
adjusting to make sure it is centered.
Pull through and sc tighten and close off the stitch by coming from
the back upward to close the stitch cut and pull yarn all the way through at the center of the v at the top-
pull tightly downward towards the back of the heart. 

Tie hearts strings to the blue loop by inserting strings through each side of center loop
and tie the peach stings together into a knot - do not pull too tight across the blue loop.

When sewing use the same color yarn in a wide eyed needle, 
Sewing carefully not showing any stitches or loose threads. 

Pull at the bottom of the heart to set it's shape.
Sew that point and also the 
rounded tops down to your project.


For The Ivory Square

I used a Crochet Hook US G - Crochet loosely
Yarn Bee - Ivory (Soft Secret) 

Chain 25
Skip Stitch go into 2nd chain.
Pull through keep two loops on the needle -
Pull through the third chain - now you should have three loops on your needle.
Pull through each of the next 4 stitches of your chain.
You should have 6 loops on your needle.
Yarn over - pull all six loops through then chain 1 - this makes
your first daisy cluster.  
Now insert your needle into the chain 1 loop you just made to close your daisy.
Pull thread through making two loops on your needle.
Look down the right side of your daisy - You should pull thread through 3
seperate times down the right side of the daisy before pulling through your chain again. 
You will then have 6 loops on your needle.   Yarn over and pull through all 6 loops.

Keep on going until you have ten daisy clusters -

 close row by inserting needle into last loop and 
chain two to finish row.  Turn your work....

 Row 2: Chain 1 skip one chain sc (single crochet) into into daisy loop
 chain 1 sc into daisy loop - do this all the way
to the end of the row.
End with sc into last loop.
turn your work over.

Row 3:  Chain 3 - Insert hook into second chain - pull thread through.
Insert hook into third chain  - pull thread through.  You should have three loops on 
your hook.  Then you should start pulling thread through 3 next chains until you
have 6 loops on your hook.  Then pull thread through all 6 loops making the daisy cluster.

Refer To The Video On Ending Your Third Row
( Only I  did not turn it to the back) 


You'll need 
7 rows of daisy clusters ending with the ( Row 2 pattern).

Now The Edging

Round 1:
 *2sc in corner space sc in nxt 19 stitches 3 sc in corner stitch*
do this on all sides.  Then...   Sc and ss stitch closed. turn

Round 2:  
1 chain 2sc in same place as ss.  (1 sc crochet in each of the side 21 stitches each)
3 sets of 3 sc with sc between in each corner.  Ending with a ss. Then crochet one in ss in the first sc.  turn

Round 3: 
chain 1, sc in same place as slip stitch.  chain 6 - 1 sc into next stitch.  skip 1, (*1 sc chain 6 - 1 sc into next stitch skip 1) - repeat from *  46 more times - ss into last sc. turn. 


Round 4

The Ruffle


dc in each chain 2 opening all the way around.  
Pay attention when you get to the corners of the square - 
dc 5 -  chain 1 - dc 5 as you get to each corner. 

ss to close at the completion of the square.


Susan Nikitenko: Creation Using The Daisy Stitch
print only


I made this purse using two of these squares.

Strap

I made the strap using a bulky cottony white yarn and 


Yarn Bee - Ivory (Soft Secret)  Crochet together.

Chain to desired length with large K needle
turn - sc another row.

You'll need:
2 wood rings and 4 matching wooden beads.

Needle and thread
glue gun

I used 2 fat quarters for the lining, fusible web and muslin.

I'm going to be making another purse:
Then is when I will give you instructions on making this purse.
With the pictures.


Monday, October 2, 2017

I Made A Skirt For My Daughter

I Made A Skirt For My Daughter


The skirt is folded in half in this picture.  I completed the skirt this afternoon,
though I started it quite a while ago.
 I embroidered the butterfly appliques and completed the lace at the bottom. 
This is the finished product.


Tuesday, March 3, 2015

My Daughters Wedding / Bird Cages Completed


My Daughters Wedding / Bird Cages Completed

We just have to buy a few more candles to put in the birdcages and 
Then we will have completed the birdcages for my daughters wedding..


Susan Nikitenko
My Daughters Wedding
March 3rd, 2015

birdcages, wedding, daughter, vintage, victorian, lace, pearls, crafting

Featured Post

Grandmas Blankets - Fall Lap Quilt Tote

I made this crochet tote to carry and deliver a lap quilt in.  It is being delivered to a man with liver cancer. The quilt is inside ...